- Category:
- All
- Design
- Illustration
- Manga
- Craft
Shannon Brouk is a professional illustrator and fine artist living in Colorado, USA. She graduated from the Savannah College of Art and Design (SCAD) with a Bachelors of Illustration in 2018. She held her first solo art exhibition in 2019 and began teaching Copic classes in 2020. Throughout 2021, she plans on recording more of her drawing/creative process and to continue working on projects involving Copic.
https://www.instagram.com/shannonbrouk/

1. Would you tell us about yourself as an artist?
I grew up in Parkville, Missouri and was raised by two very “left-brained” people. My mother is the most creative person in my family (besides myself ☺ ) and she had a career in fashion before she gave birth to my older sister and me. I always liked to doodle growing up, but I never saw myself being a professional artist until I was encouraged to enter my drawings to local, state, and national competitions and started winning. It was during my junior year of high school, at age 16, when I realized I wanted to be artist. I enrolled at the Savannah College of Art & Design (SCAD) and received a Bachelor’s in Illustration in 2018. Since then, I’ve had my first solo art exhibition in Kansas City in June 2019 and have been focusing on creating cohesive bodies of work using any (or all) of my 3 favorite mediums: Copic markers, colored pencils and pens.
2. What made you start creating art? What is your artistic background?
As far back as I can remember, I’ve always been doodling and drawing. My earliest memory of drawing was when I was around 6-8 years old, and I would draw comics about a character I made up who was a wannabe Rockstar racoon named Ricky. I would doodle stories about him and his quest to find other animal band-mates. I’m not sure why I started drawing Ricky the racoon, but later I would try and draw characters that I saw on Disney Channel like Lizzie McGuire or Kim Possible. Colored pencils and markers were always my go-to choice when drawing and coloring as a kid, and that hasn’t changed one bit into adulthood ☺
3. What inspires you? What is the theme/general motif of your works?
Growing up, when I wasn’t in school, I was either drawing, reading or swimming. What inspired me to practice drawing was how many books I read about artists I thought were cool, which, in high school, meant fashion illustrators (because my mother’s love of fashion rubbed off on me, I was drawn to artists like Charles Gibson, J.C. Leyendecker, Erté and Antonio Lopez). Today, I draw less inspiration from fashion illustrators and more on artists who were making art during the Art Nouveau period (around 1895-1918) like Alphonse Mucha and Gustav Klimt. I also almost double-majored in Illustration and Art History while at SCAD, so I get a lot of inspiration from art and religious objects made in Eastern Europe and the Middle East during the Middle Ages as well.
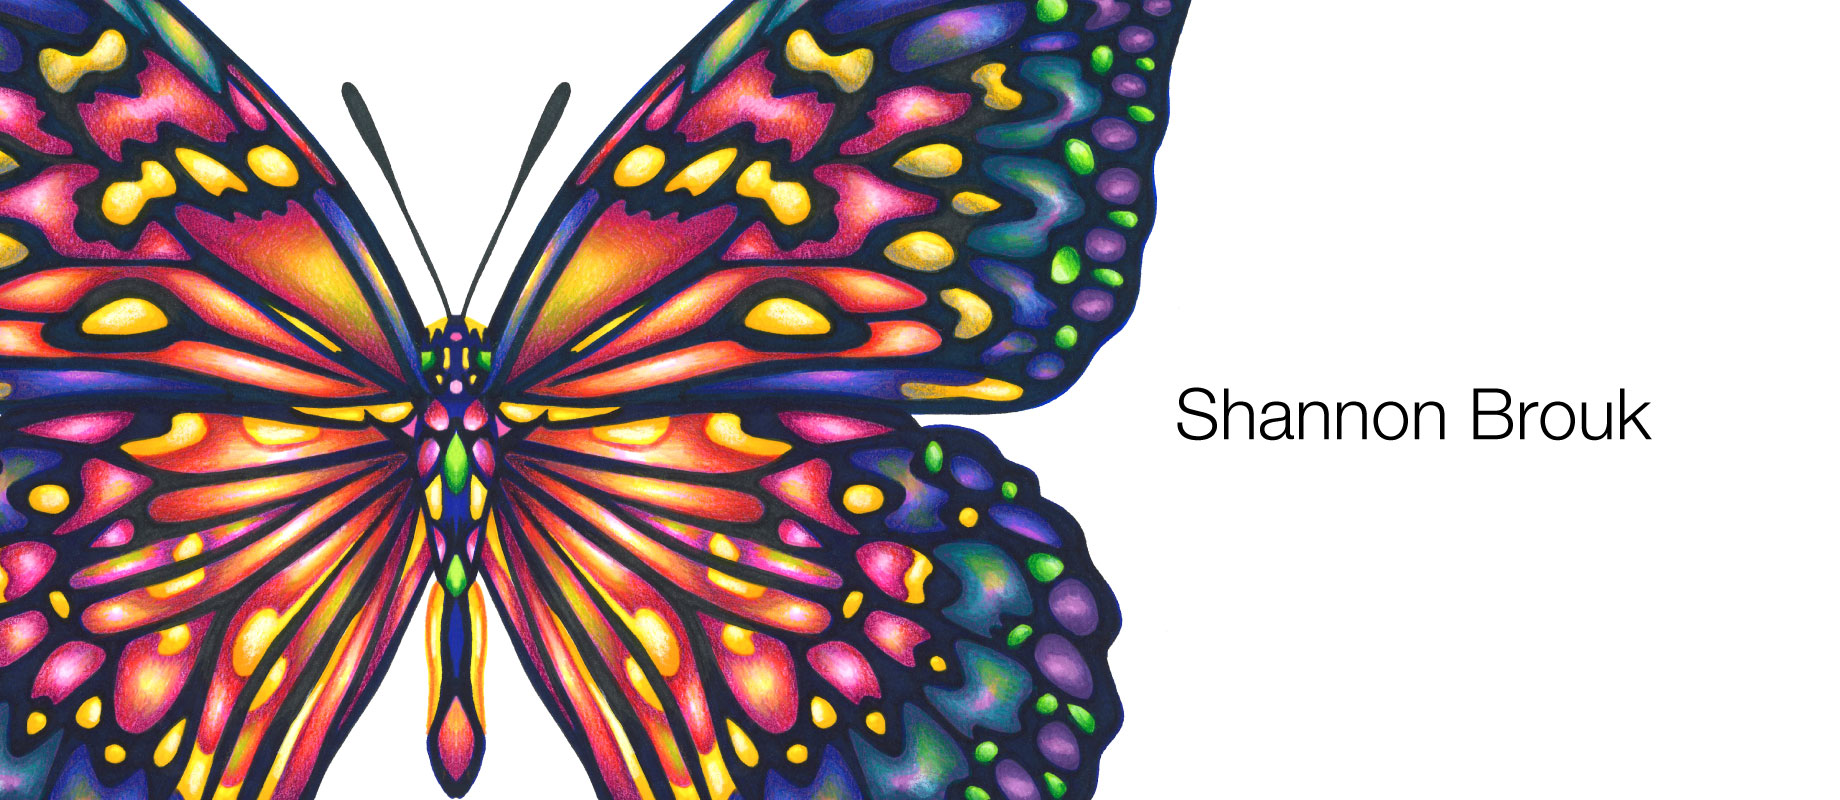
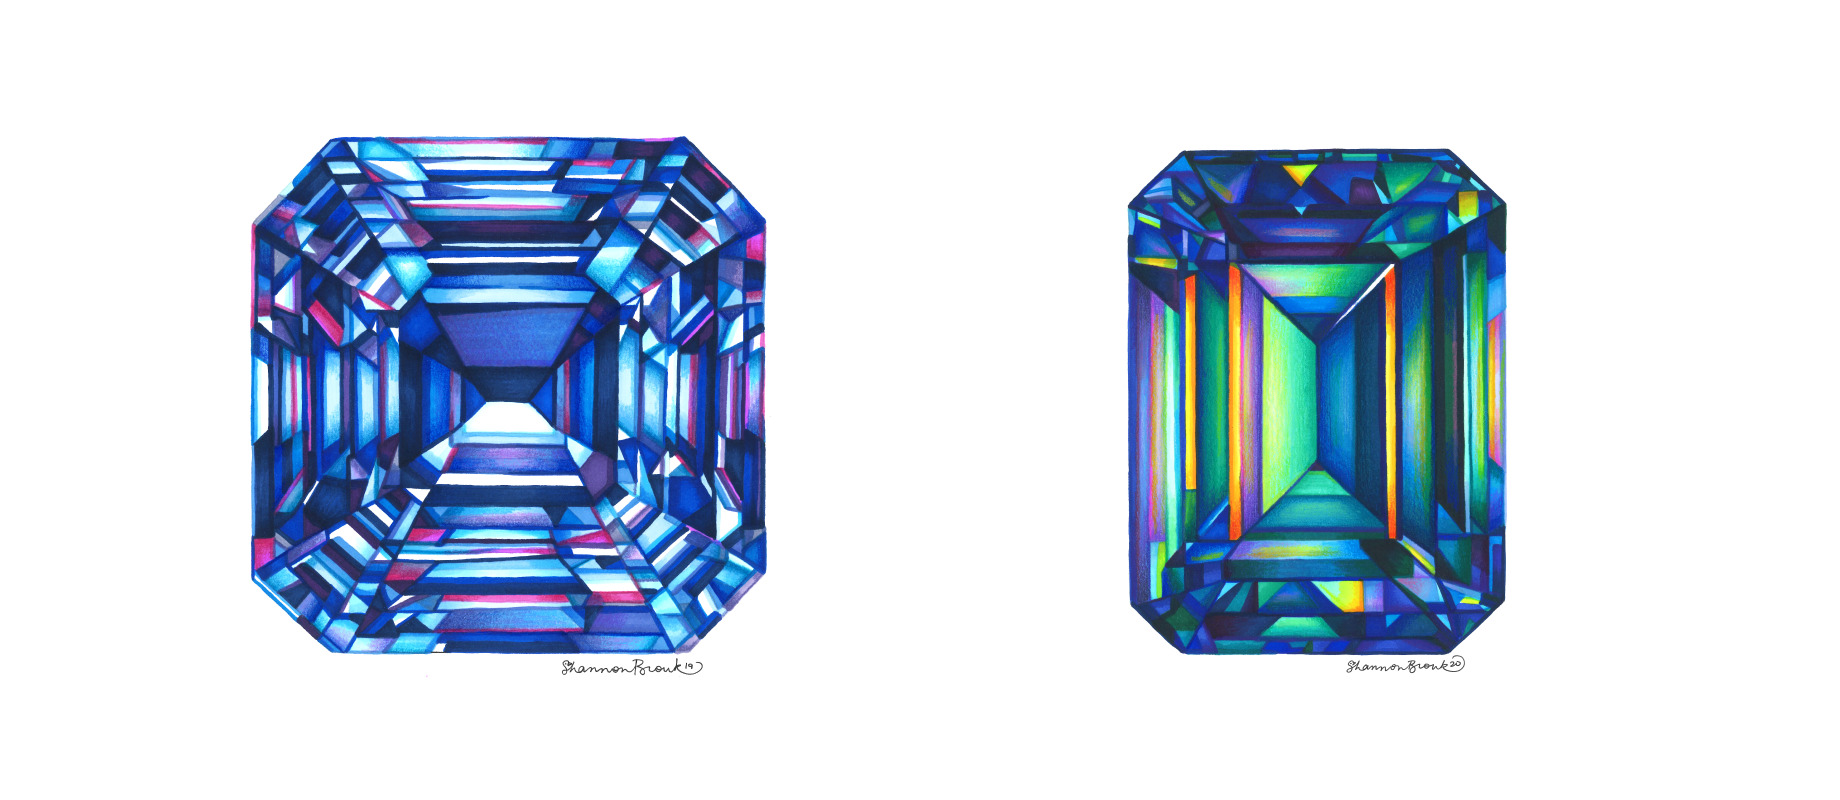
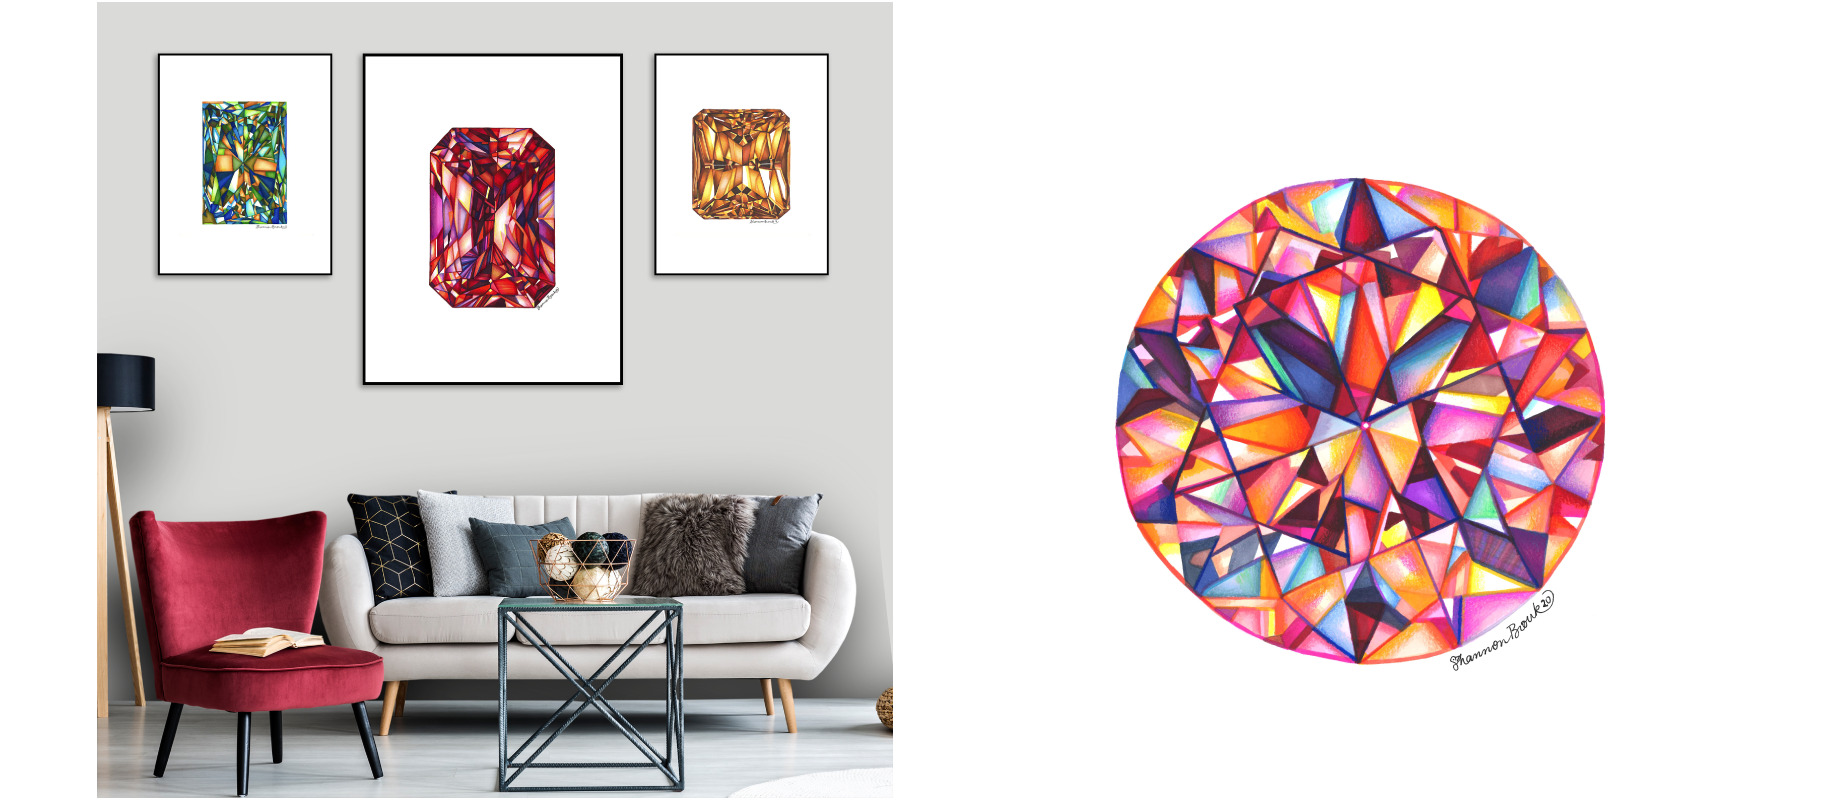
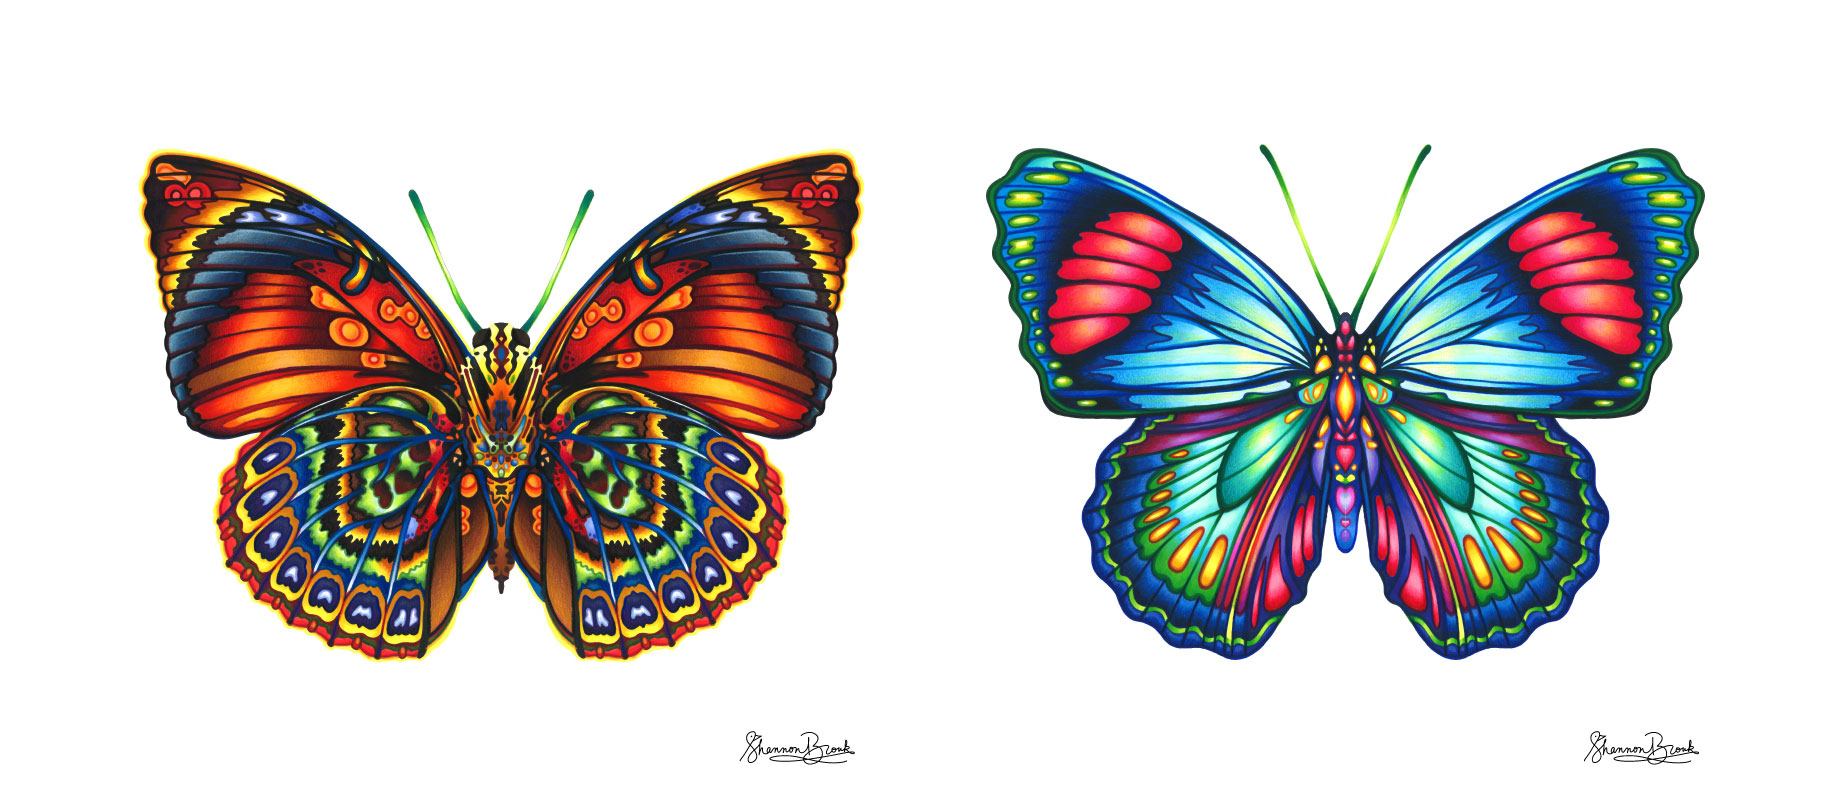
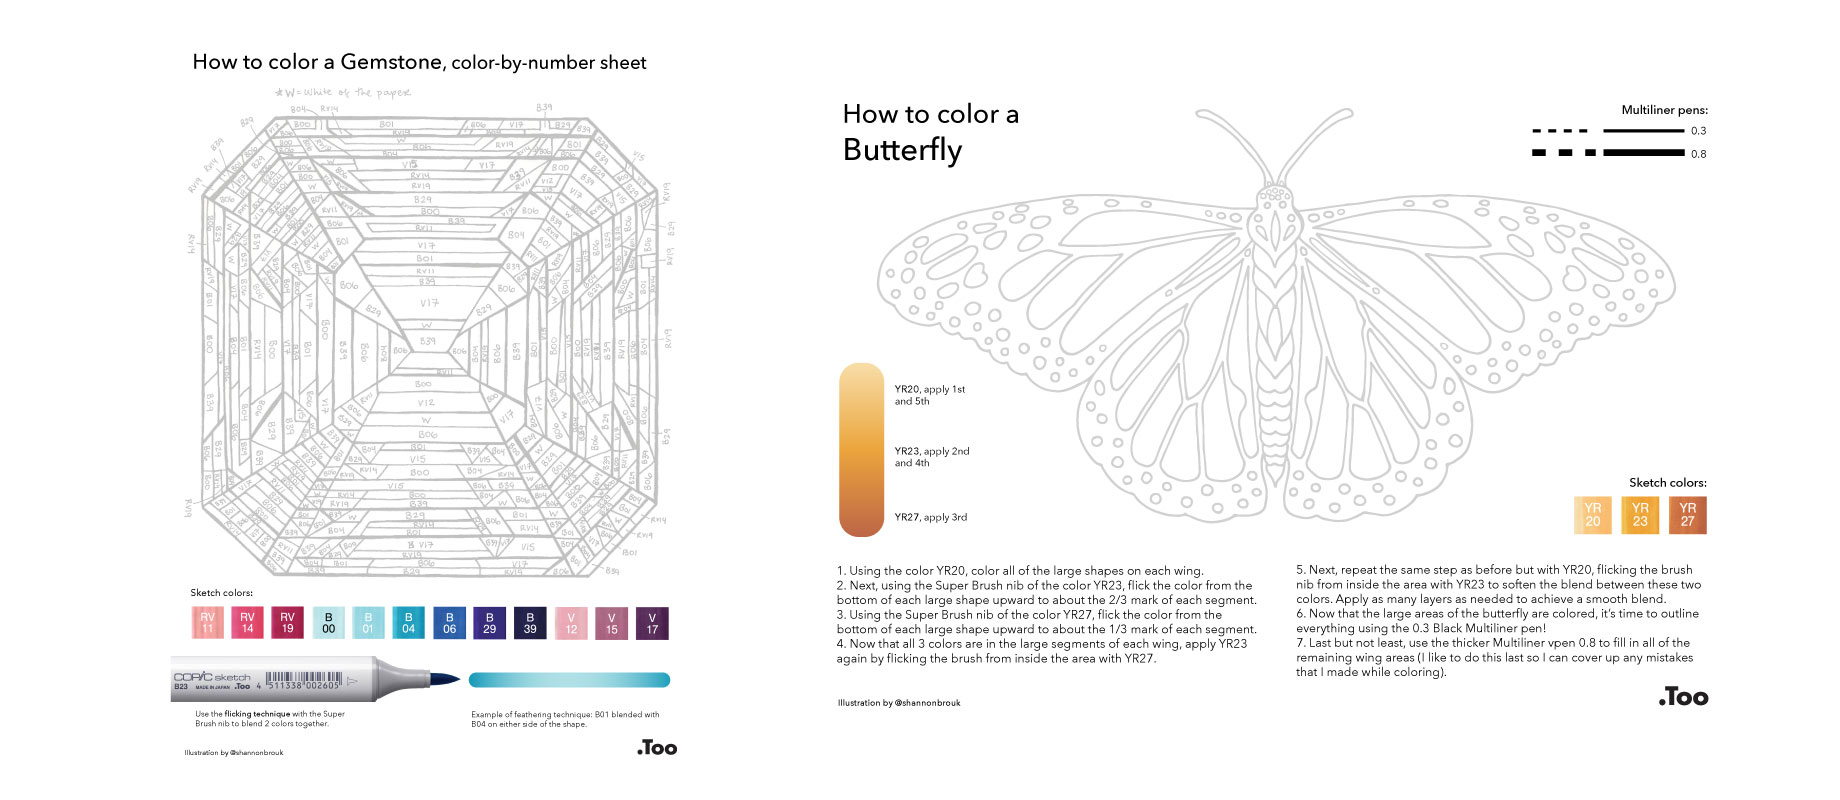
4. Would you tell us about your current artworks, the Butterflies and Gemstone series? Could you tell us how these illustrations were created?
At the end of 2019 I started my series of Diamond/Gemstone drawings, and this series of drawings went on for a year, which was the longest I had ever focused on one subject (and the largest body of work I’ve ever created with 35 total drawings). For every gemstone drawing, I used Copic A4 Thick Marker Paper (orange packaging), Copic markers and Prismacolor colored pencils. Drawing each gem would usually take an hour, the coloring process with Copic about 7 hours and the finishing touches with colored pencils about 2 hours. All in all, each drawing would be around 10 hours to complete.
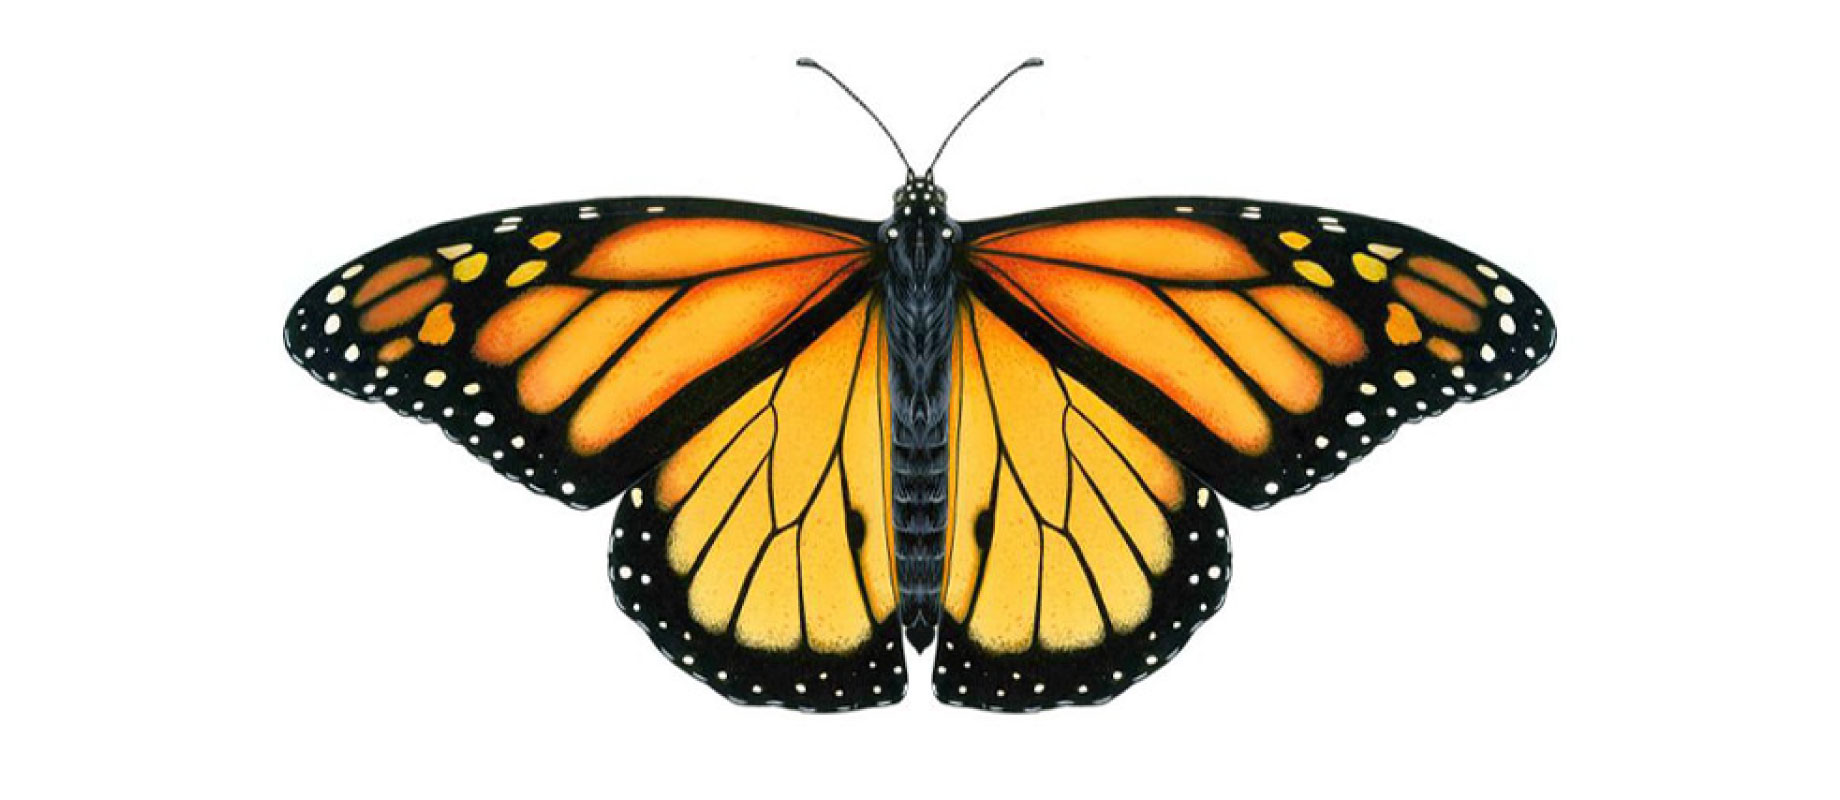
At the end of 2020, I wanted to changed gears and continue to work with something very colorful, but with symmetry and a digital flair. So that’s when the butterfly drawings got started!
For each of these drawings, I used the same Copic A4 Thick Marker Paper as I did with the gemstones, and these drawings were scaled up to be a bit larger than the gems on the paper, so each one has taken me about 13 hours to complete (1 hour of sketching, 8 hours of Copic and 4 hours with colored pencils). What I’ve learned going from drawing gems to butterflies is how well Copic markers look with colored pencils. I wanted to show more of the grainy pencil texture with the butterflies, especially with larger blended areas, so I’ve been spending more time adding pencils on top of the Copic for this body of work compared to the last.
A few tips I have:
-ALWAYS use colored pencils AFTER you’re done using Copic. If you add Copic on top of colored pencils, the wax or oil base of the pencil will pick up and stick to your nib, damaging it.
-Start small and work your way up (in paper size). Coloring and blending large areas smoothly is not easy, so once you get the hang of things, then start to make larger pieces (plus, it takes a LOT less time to complete a small illustration versus a large one).
-I like to add my lightest colors first and gradually add in the darker colors. To me, coloring with Copic is a lot like coloring a watercolor painting; it’s a lot easier to add layers/go darker, but it’s much harder (almost impossible) to take away a dark pigment once it’s on the page.
-Technology is your friend (sort of)!! I have a standard HP office printer with a scanning bed in my studio, making it super easy to get a clear image of my illustrations. Touch up and make any edits to your Copic drawings in Photoshop and use my favorite “cheat” of the horizontal or vertical flip. If you’ve ever wondered why my butterfly drawings look so perfectly symmetrical… it’s because I only colored half of the butterfly, duplicated it, and flipped it along its central axis 😉
5. When did you first start using Copic markers and what made you do so?
I first started using Copic markers when I was 13 years old/in middle school. I would often go to Hobby Lobby with my mom and when she looked at fabrics, I looked at the art supply section. I noticed Copic markers were locked behind a glass door, and I thought to myself, WOW, those must be really fancy markers! A few weeks later I convinced my mom to buy me the Ciao 6pc skin tones set, and when I got to high school, I got the Sketch grays with the Multiliner SP set. Also in high school, I started buying individual Sketch markers (since my Hobby Lobby store didn’t have an individual Ciao marker display rack) and I started collecting the blues, greens and browns. I was interested in landscape drawings and drawing people when I was in high school, and the Prismacolor marker set that I had was great for me as a beginner, but when they dried up I had to throw them away. How I convinced my mother to buy Copic for me was that there were refills that made your markers last really long! And I’ve been using them ever since (and I still use the same Ciao skin tone markers and Sketch Neutral Grays I got 12 years ago!)
6. What are your favorite Copic colors and why?
When I was younger, I wanted the most saturated colors (since I liked how bold they were). However, my taste has changed as I’ve gotten older, and I’ve really come to love the “dull” colors, like V91-V99, R81-89, YG91-99, BG90-99 and B91-99. That’s what’s so great about Copic: there are 358 markers/so many choices and so many options of color vibrancy!!
If I had to choose one favorite color today, it would probably be B29, Ultramarine. I grew up being a competitive swimmer and am partial to blue in general, but I especially love the rich, dark and powerful punch that B29 has when you color with it ☺ However, other close favorites for me would be RV29 (Crimson), B63 (Light Hydrangea) and BV00 (Mauve Shadow).
7. Would you tell us about your activity as a Copic Instructor in the US?
I first met the Copic USA team at the NAMTA (the International Art Materials Association) trade show in San Antonio, TX in February 2019. It was there that I showed the Copic USA team my sketchbook and all of my drawings made with Copic markers and Multiliner pens. The team was very impressed, so I was hired to be the Copic demo artist at the MacPherson’s Dealer Workshop in Las Vegas, NV in June 2019. It was at this MacPherson’s event where I gave my first recorded Copic demonstration. Soon thereafter, I became a part of the Copic USA team full time and have since continued to be the product demonstrator at conventions and trade shows alike (virtual or in-person). So far, I have also done 5 Copic project demonstrations for Michael’s, and I have begun to create, color and record myself completing original projects explaining my techniques.
8. Could you tell us any tips and techniques when you illustrate with Copic?
If you have a Lamborghini, would you drive it on a gravel road? No. If you have Copic markers, should you color with them on regular printer paper? Absolutely not. Just because you have a phenomenal tool does not mean it will work great on anything. Drive your Lamborghini on a track and use Copic on great marker paper. Show your high-quality tools the respect they deserve, the quality of the surface absolutely matters 😉
Read a lot about the artists(s) who inspire you. This can be in books, magazines, online newspapers or blogs, etc. Reading, gathering information and finding what inspires you is just as important to your artistic journey as having the skills to execute your vision.
Watch a lot of “how-to” videos, technique videos and artist time-lapse videos. There are a lot of details people will talk about when they’re coloring, so take note and pay attention! YouTube is an easy way to find Copic artists from all over the world share their techniques and how they use the markers.
Learn and master the “flicking” technique with the Super Brush nib and understand that you can layer the same color over and over again to create a darker shade & create depth.
-Be comfortable with making A LOT of mistakes at first. I was terrible at blending my markers together when I first started. But, by the end of high school, I got pretty good at it. Start small and work your way up in paper size and the size of the drawing you’re coloring too.
9. Could you tell us about your dreams and artistic goals?
I would love to start my own YouTube channel/record my drawing and coloring process for people to see. I think reading is a wonderful source of information but seeing someone do something you can’t do yet is very helpful.
It’s been a dream of mine since high school to have my work exhibited at galleries or museums in the US and/or around the world. Artwork made with materials like markers, colored pencils and pens don’t seem to get as much respect as those who work with oil paints/paints in general. I’d love to be one of the artists who can change that and have marker drawings in galleries.

10. Additional info from Shannon:
Just because everyone else seems to be making digital paintings on an iPad (or in Photoshop) does not mean that you have to as well. If you feel the most comfortable making traditional drawings with markers, pens and pencils, do it. The one thing I wish I would have done differently while I was at SCAD was working digitally during my Junior and Senior years. Stay true to the materials you feel the most comfortable with, and people will recognize your talent for how good your art is, not because you’re a digital artist.